

The day the gutters came down from our neighbor's house, I knew my front yard was in trouble.
A few autumns ago I covered half of my slightly sloped yard with newspaper and mulch and planted it with water-wise perennials, herbs and ornamental grasses. At about this same time, the house next door went up for sale. In their haste to bring the home up to sellable condition, the owners ripped off the rusty old gutters and didn't replace them.
All was well until the inevitable torrential spring rains of Texas arrived. Water flowed freely off of the neighbor's roof, into our adjoining side yard and down my front yard. More than once, I found myself shoveling mulch and soil from the sidewalk. A few plants actually drowned. Something needed to be done, short of me asking the young family who had moved in next door to please put in some gutters.
Ultimately, installing a dry creek bed through the front of my yard seemed to be the perfect answer. Coming in many shapes and sizes, a dry creek is simply a gully or trough filled with rocks and is built for the purpose of directing the flow of water.
I figured that my creek bed, with a few natural-looking twists and turns added to it, would measure about 23 feet long. I didn't think it would need to be either very deep or very wide. (However, in hindsight, I wish I had made it slightly wider and deeper, as I am still experiencing occasional flooding over and beyond its banks. Never underestimate the power of rushing water.) I decided on 1 foot wide and about 6 inches deep.
Based on these measurements, my next task would be to figure out how much hardscape material I would need, and what kind of pebbles and rocks I wanted to use.
Generally, landscapers advise that a dry creek bed should consist of several different sizes of rocks to achieve both maximum water carrying abilities and a more natural look. I already had several fairly large (12 inches and bigger) stones aligning our backyard which were not serving much purpose other than unsuccessfully keeping critters from crawling under the fence. So, eight of these big stones were lugged into the front yard for eventual use in my new dry creek.
Beyond that, I figured small colorful pea pebbles mixed with larger 2 to 3 inch Mexican gray beach pebbles would line the sides and bottom of the creek and would look nice too. But how much to get?
Most pebble materials are sold in bags measured in cubic feet, or in bulk by the ton or cubic yard. To calculate my needed amount in cubic feet, I used this online calculator. I entered 23 ft. long, 1 foot wide and 0.5 feet high (or deep, in this case) and hit the "calculate" button. The answer? I would need 11.5 cubic feet of pebbles for my project. I decided to round up to 12 just to have some extra.
My next dilemma was whether to order the pebbles from the local materials company and have it delivered or buy them in bags from Home Depot. Although ordering from the materials company is generally cheaper, I didn't really have a good place for their truck to dump the rock, which is what they generally do. Having a large pile of pebbles in my driveway did not sound very nice. Neither did making endless trips with the wheelbarrow to haul it around to the front of the house. So, I opted to pay a little more and started slowly building up a cache of bagged pebbles from my local Home Depot.
The pea pebbles are fairly cheap -- around $4 for a .5 cubic foot bag. I wanted my ratio of pea pebbles to Mexican beach pebbles to be about 2:1. Therefore, I calculated that I would need about 8 cubic feet of pea pebbles, or 16 bags. At $4 per bag, that's $64.
Unfortunately, the lovely gray Mexican beach pebbles I wanted are fairly costly by the bag: around $15 for .5 cubic foot. I would need 8 bags of these, totalling $120. So I was looking at a grand total of just under $200 for pebble material.
If you go the route of ordering directly from a stoneyard, the materials will probably be cheaper overall, but you'll most likely have to pay a delivery charge. And you'll need to have a place to store the rock until you're ready to use it, unless your planned creek bed location is easy for a dumptruck to access. Also, if your creek bed will be relatively small, make sure the stoneyard will sell smaller amounts of materials. Most usually sell by the ton or cubic yard.
Next, map out the path of your creek bed. A stick-straight creek will not look natural at all, so add a few turns. Use flags or sprinkle flour to mark where you'll be digging. Then recruit a few friends and get out your shovels.
A dry creek bed doesn't have to be especially deep to be effective - a few inches will do in most situations. Make sure the "point of entry" for the flow of water is somewhat flat so the water will be diverted into the trough.
Mound the soil you dig up along the sides, and make it a little deeper wherever you have a turn in its path. This will also allow you to add a few larger rocks that will help redirect the flow of water through the turn.
Once the trough has been dug, it's a good idea to line it with heavy landscape cloth. This will prevent weeds from growing through the rocks and will also cut down on mud mixing in and flowing down your creek bed. Affix the cloth to the ground with metal garden staples.
Now it's time to lay the rock. Start with your biggest boulders and stones. Set them along the lip of the creek, not in the actual trough. Dig them in a little bit so they look like they've been there awhile.
The medium size of rock you're using should then be spread in the bottom and along the sides of the trough. Finish up with the smallest pebbles, making sure you completely cover the landscape cloth. Again, allow the turns in the creek to be a little deeper.
Of course, you can really get creative with your creek and even use it to irrigate the rest of your yard by adding "fingers" to the end, thus diverting water to several different areas. You can also get serious and mortar the bigger stones into place to ensure they don't travel, but this can be pretty labor-intensive.
Add some mulch to the sides and tuck a few plants in among the large boulders, if desired, to soften the sides and give your new creek bed a finished look.
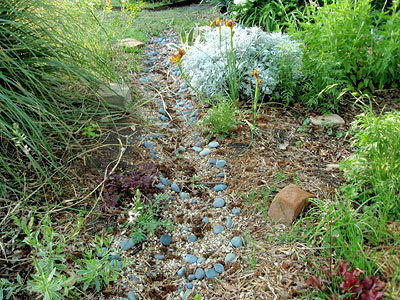
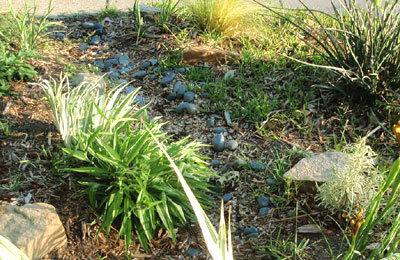
The following photos are of my creekbed, from several different angles.

Copyright © www.100flowers.win Botanic Garden All Rights Reserved