

It is an unfortunate statement of fact that there are not enough vine poles in the world. So do your part: Build a vine pole (or two) this summer. Here are directions and plans to build just that many.
continue reading below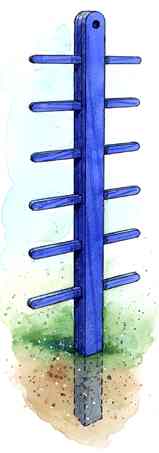
1. Begin this vine pole by cutting the crossbars to length from 1x2s. Then use a pencil in a compass to mark the semi-circle at each end. Cut just to the waste side of the line with your bandsaw or jig saw, then use 120-grit sandpaper in a sanding block to sand to the line.
2. Crosscut one of your 1x4s into the spacers used in the middle layer of the vine pole. You'll need one piece 9-1/4 inches long, five pieces 8-1/2 inches long, and one that measures 35-1/4 inches.
3. Start assembly by laying one of the 8-foot 1x4s on your workbench. Take the spacer that's 9-1/4 inches long, and position its end flush with the top of the 1x4, and also carefully align the edges. Fasten the pieces face-to-face, using 3d (1-1/4 inch) galvanized finishing nails and weatherproof glue (Franklin's Titebond II is one brand).
4. Position a crossbar against the bottom of the top spacer. Make sure that the crossbar is centered end-to-end, then glue and nail it. Repeat this process for the remaining crossbars and spacers. Glue and nail the final 1x4 face-to-face to complete the assembly.

5. Use a pencil in a compass to mark the curve at the top of the vine pole. Cut it with your jig saw, then smooth the cut with sandpaper. Drill the hole through the vine pole. Use sandpaper to remove any sharp edges from the project.
6. Paint or stain the vine pole any color you desire.
7. Dig a hole 28 inches deep for your vine pole, and put four inches of crushed rock in the bottom to promote drainage. Have a helper hold the post plumb while you backfill the hole. As you replace the soil, tamp it firmly with the end of a 2x4.
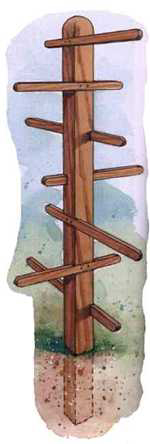
1. With support arms on each face of the post, the vine pole resembles the old-time roadside sign posts. Each of the support arms is recessed into a 1-1/2-inch-wide by 3/4-inch deep dado (a groove) in the 4x4 post.
2. To locate the upper edge of the topmost dado, measure 5-1/4-inches down from the top of the post. Using a pencil and a square, draw a line across the post. Draw a second line 1-1/2 inches below the first line to indicate the lower edge of the dado.
3. Roll the post one-quarter turn to bring the next face of the post to the top. Mark the top of the next dado 7-1/2 inches below the bottom of the first dado. Mark the bottom of the second dado 1-1/2 inches farther down the post. Continue rotating the post and marking the dados (7-1/2-inch spacing) until you have seven dados marked.
4. You have several options for cutting the dados. If you have a circular saw or radial-arm saw, set the blade to a 3/4-inch depth, then create the dados by sawing across the post repeatedly until the dado is the proper width. You could also use a router (with guides). Finally, you could use a backsaw and chisel to create the dados the old-fashioned way. In any case, be sure to clean up the dado for a trim fit.
5. The top of the post is rounded to a 1-3/4 inch radius. Mark a semi-circle of this radius on each face of the post. Use a saber saw or wood rasp to roughly shape the post. Finish with sandpaper to smooth the curve.
Cut the support arms to 18-inches long, then use a jig saw, saber saw, or coping saw to round the ends to a 3/4-inch radius.
6. Use 120-grit sandpaper in a sanding block to smooth the curves and to remove any sharp edges from the crossbars and post.
7. To maintain the signpost look, the support arms are not centered in the dados. We set ours so that one end of each arm extended 9 inches from the edge of the post; this left 5-1/2 inches extending from the other side. Fasten each arm to the post with two #6 x 1-1/2-inch flathead deck screws. Drill countersunk pilot holes to avoid splitting the crossbars.
8. Apply your choice of finish to the vine pole. We used a pigmented oil stain.
9. Dig a hole 28 inches deep for your vine pole, and put four inches of crushed rock in the bottom to promote drainage. Have a helper hold the post plumb while you backfill the hole. As you replace the soil, tamp it firmly with the end of a 2x4.
Copyright © www.100flowers.win Botanic Garden All Rights Reserved