

Make sure your pot is clean and sanitary before you start. Brush out any old dirt, wash and then rinse the pot in a dilution of bleach and water, about 1 cup of bleach to 2 gallons of water, then rinse again with clear water. Don't let a clay pot soak in the bleach water, just rinse it.
Since the pots with flowers will sit on the patio, I like to put a coffee filter in the bottom to keep dirt from leaking. 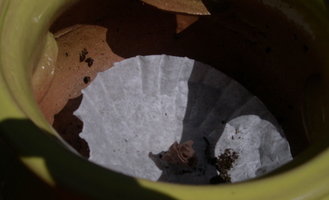 As you will see later, this also helps with one of the watering tricks. Cut a piece of wicking, such as a piece of old pantyhose, and poke it through the coffee filter. Have the panty hose hang part way out of the pot (about an inch). This helps keep the bottom plants from sitting in soil that is too wet if you've had a stretch of rain. It will actually wick water out of the pot. I know this doesn't make sense, but it works. A detailed discussion of this process is found in the Container Gardening Forum.
Use a well draining potting soil, and if it doesn't have water crystals, now is the time to add them. Put the potting soil in a bucket and add water until it is very moist but not soggy. Fill the strawberry pot almost to the level of the first holes. Pull that piece of panty hose wick up into this first few inches of soil.
If you are using bedding plants, you may wonder how will you get that big ball of roots and soil through that little hole? Here's a trick! Put the plant into the big opening at the top and carefully work the plants out through the hole. You might even wrap the leaves in a strip of newspaper to keep them together. Totally backwards from what I would try to do. Don't overfill the hole, one plant per hole is plenty, they will fill out. Push the rootball gently down into the wet potting soil.
Once you have the lowest level of holes with filled with plants, adjust them so that the roots are all in the pot, not way out in the openings.
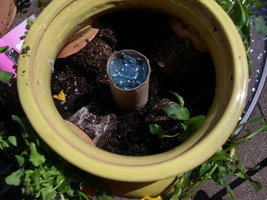 Watering trick # 1. If the pot is shallow, get the cardboard tube from a roll of toilet paper. If it is taller, use a paper towel roll. Stand the roll up in the center of the pot and fill with gravel or small rocks. I like to use the rounded glass that is used in flower arranging as they are easier to pick out at the end of the summer before I dump the dirt into the compost heap. Rocks in the compost don't thrill me.
Add more potting soil up to the next level of openings, keeping the paper roll centered as best you can. It doesn't have to be perfect, or I wouldn't be doing it. Plant the next row of plants, and repeat until you get several inches from the top.
Planting the top plants was where I made my biggest mistake. Wanting a filled out pot immediately, I would pack in as many plants as fit into the top, then would wonder why they didn't get any bigger. They didn't have anywhere to grow! For every plant you put in the top, make sure there is an equal amount of room with fresh potting soil next to it. For my smallest pot, the brown jar in the picture above, only two plants will fit. The yellow jar and the tall jar will each get three, maybe 4. Because my soil was nice and wet to start with, I don't water right away, but let everything settle down on its own. 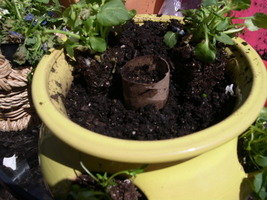
If the cardboard tube sticks up out of the soil, I like to cut it off when I'm planting flowers. When it is time to water the pot, pour the water slowly into the center pipe of rocks. This gets water right to all of the roots in a more even fashion. The cardboard tube will fall apart in no time, leaving just the rocks down the center.
Now it is time to plant the tall strawberry jar that will actually have strawberry plants.
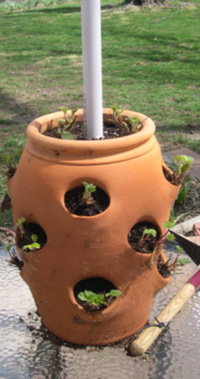
Watering trick #2. I went to the local box store and asked for a scrap end of plastic PVC pipe cut a bit taller than my pot and a fitted end cap. At home, I put the capped pipe into the unplanted pot (cap down), and marked where the openings in the jar were located, minus a couple of inches because it won't go all the way to the bottom. With my helpful neighbor Jerry, we drilled small weep holes at the marks on the pipe. 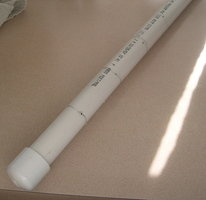 Plant the strawberry jar in the same fashion as the bedding plants, making sure the strawberry roots are covered, but the crown of the plant must not be sitting under the dirt. On this pot, I leave the pipe sticking out of the top. This is a choice you can make, I like it because the pipe will hold more water. This pot sits on the wall of the raised vegetable bed, so looks aren't as important. Don't fill the pipe with rocks, it isn't necessary. If I decide to cover the pot with netting, I hook the netting on this pipe to keep it up high on top.
Bonus Trick! Grandpa taught me this last trick for planting strawberries. Put small red colored items into the edge of each opening and a few in the top. He used bottle caps, but plastic checkers or rocks with a coat of red nail polish work just fine. The birds will hopefully get confused and give up before your berries turn red.
 Now if you are a messy gardener like me, there will be dirt all over the pots, the table and you. This is a happy thing! You can rinse the dirt off later, just sit and enjoy your work for now. In no time at all, you will have pretty, full strawberry jars, and fresh berries for breakfast each day, and who wouldn't love that?
<<<< It's not much to look at now, but it won't be long before I have my first berries!
Pictures taken in my yard.
(Editor's Note: This article was originally published on April 15, 2008. Your comments are welcome, but please be aware that authors of previously published articles may not be able to promptly respond to new questions or comments.)
Copyright © www.100flowers.win Botanic Garden All Rights Reserved