

 Enhance peaceful evening moodswith a constellation of twinklinglanterns.
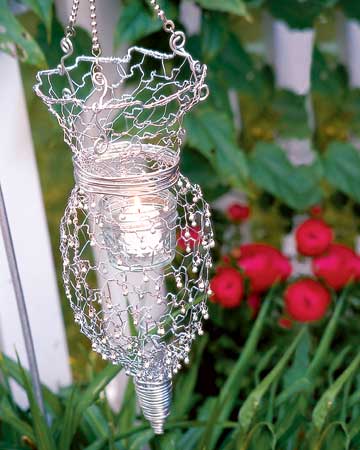
Hang these lanterns from hooks lining a path or to border a patio. The beaded hanging lantern is fashioned from wire mesh; transparent and silver beads sparkle with reflected candlelight.
continue reading belowBasic Supplies:
 Step 1
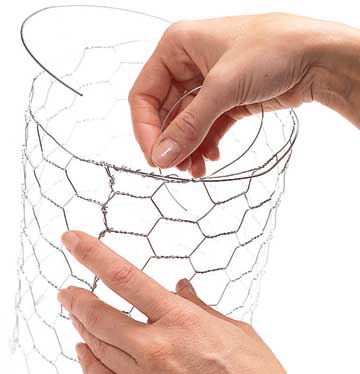
1. Make the cylinder. Wearing work gloves, carefully unroll the poultry netting. Using wire shears, cut a 16 x 20-inch rectangle. Form one 20-inch side from the top edge of the netting. Shape the wire netting into a cylinder and twist the wire ends together.
 Step 2
2. Reinforce the opening. Using wire cutters, cut a 21-inch length of 16-gauge galvanized steel wire and wrap it around the top of the cylinder. Bend interlocking loops at each end to join the wire ends together. Cut a 32-inch length of the 22-gauge galvanized steel wire and wrap it around the 16-gauge wire.
 Step 3
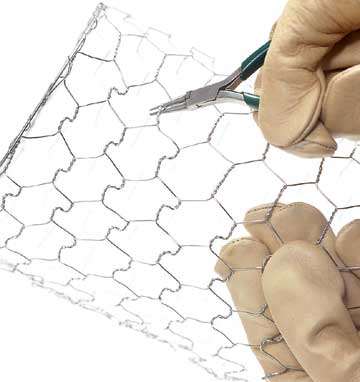
3. Bend the body netting. Using round-nose pliers, bend and twist the horizontal wires of each netted hexagon. Starting at the top of the cylinder, work downward in rows to twist all the horizontal wires.
 Step 4
4. Bend the neck netting. Using round-nose pliers, bend the wrapped 16-gauge wire at the top of the cylinder, skipping every other hexagon.
 Step 5
5. Form the neck. Count down three to four rows from the top edge of the netting and, wearing work gloves (if desired), pinch the vertical wires closer together. The netting will begin to pull inward. Keep the neck large enough to accommodate a jelly jar.
 Step 6
6. Form the body. To form the bottom of the lantern, squeeze the vertical wires closer together to form the shape, squeezing the bottom of the cylinder into a cone-shape point.
 Step 7
7. Wrap the neck. While holding the roll, wrap solder wire around the neck of the lantern six times. Cut the solder and bend the ends inward to hide them.
 Step 8
8. Wrap the point. Beginning at the tip, hold the solder wire and roll and wrap the wire around the cone-shape point. Neatly wrap the wire around the entire point, cut the ends, and bend the ends inward to hide them.
 Step 9
9. Make the hangers. Cut three 5-1/2-inch lengths of solder wire. Using needle-nose pliers, coil one end of each length. Evenly spacing each length around the top edge of the lantern, wrap the center of each solder wire around the wrapped 16-gauge wire. Coil each of the remaining solder wire ends.
 Step 10
10. Hang the jelly jar. Cut two 15-inch lengths of 22-gauge galvanized steel wire. Wrap the center of each wire around the lip of the jelly jar, leaving equal lengths on each side. Twist the wire together to secure the jar. Lower the jelly jar into the lantern, and thread the wire ends through the lantern in the positions desired. To hang the jelly jar, twist the wire ends around the poultry netting.
 Step 11
11. Attach the beads. Using two needle-nose pliers and 6mm jump rings, attach silver beads to the center of each bent hexagon.
 Step 12
12. Add the chain. Cut three 4-inch lengths from the bead chain. Snap a bead chain loop connector to each end of the chain lengths. Loop one end of each of the three chains over the coiled end of each of the three solder wire hangers. Thread the opposite bead chain loop connectors through two 9mm jump rings. Attach the jump rings to a 24mm split ring.
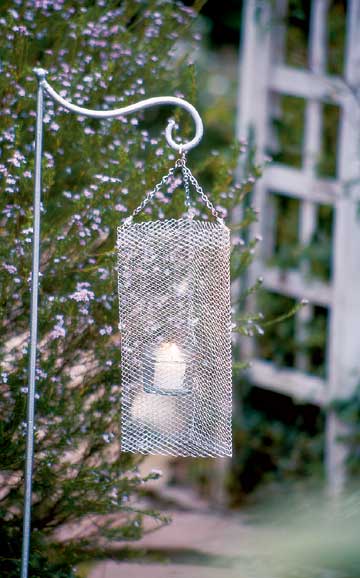 Three rigid sides on thiscontemporary lantern make itsuitable for standing on atable and for hanging.
1. Using a 17 x 12-inch mesh rectangle, fold down approximately 1/2-inch along each of the 12-inch sides. Fold the mesh into thirds, gently fitting together the rough ends to close the seam. Cut three 15-inch lengths of 22-gauge galvanized wire, and wrap each around the lip of a jar.
2. Twist the wires together to secure, leaving one end of each length longer than the other. Place the jar in the lantern as shown in Step 10 of the Beaded Hanging Lantern instructions.
3. Thread each of the long wires through a corner of the mesh, embellish with beads, and coil the remaining wire ends to secure the beads.
4. Refer to Step 9 of the Beaded Hanging Lantern to make the hangers.
 This jester-style, cone-shape
lantern gleams with transparent
seed beads.
This jester-style, cone-shape
lantern gleams with transparent
seed beads.
1. Download the free pattern for this project. (Downloading requires Adobe Acrobat software.)
Cone Lantern pattern
Download Adobe Acrobat
2. Enlarge and transfer the lantern pattern onto mesh using a marker, and cut out the design with scissors. Roll the mesh into a cone shape and sew the seam closed with a needle and thread.
3. Outline the flap edges with glitter paint and sprinkle seed beads over the wet glue. Draw details on the cone with glitter paint and sprinkle beads into the wet paint. Cut and wrap a 16-gauge galvanized wire to fit around the opening of the lantern, beneath the flaps.
4. Refer to Steps 9 and 10 of the Beaded Hanging Lantern instructions to complete the lantern.
Copyright © www.100flowers.win Botanic Garden All Rights Reserved