

The simple plant support is suited in style to a country garden and is a good project for an intermediate woodworker, or a beginner willing to learn a few new tricks. The most difficult part of construction is cutting the bevels in the four corner posts.
Tools and Materials List:
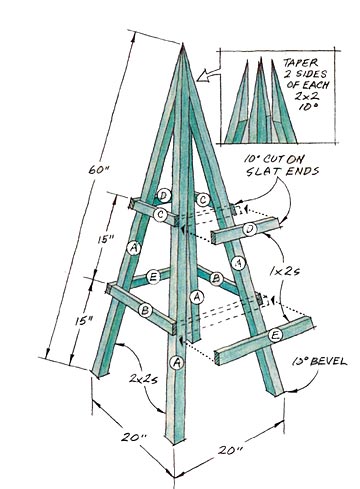
1. Make angle cuts.
Mark the 10-degree angles at the top of each of the four legs (A) with the protractor and pencil. Mark two adjacent sides of each leg. Then make two cuts on each leg to create the angles shown.
2. Join legs.
Lay two legs on a flat surface with the tops joined. Glue with construction adhesive and screw the tips together. Do this by screwing in one screw from the left side of the wood through the joint and the other from the right side of the wood through the joint. Then glue and screw the other two legs following the same method.
3. Measure and mark.
Measure 15 inches up from the bottom of all four legs and make a small mark. Measure up another 15 inches and make another mark. (Tip: Tack a small piece of wood across the bottom of the legs to hold the legs steady while measuring and marking. Do not place tack piece where parts C, B, D, or E will go.)
4. Cut horizontals.
To make pieces B and C, position a length of 1x2 just below each mark. Using the outside of the leg as a guide, mark lines on the 1x2 to show where to make the cuts for each piece. Cut, following the marked, slightly diagonal angle for the leg. Using these as patterns, make one more of each for the other side of the obelisk.
5. Attach horizontals.
Attach B and C to the first pair of legs using construction adhesive and one screw per joint. Repeat with the second pair of legs. Set both pairs of legs upright and screw them at the top. Measure, making sure legs are an equal distance apart.
6. Add more horizontals.
To make pieces D and E, take a piece of 1x2 and hold it in place. Using the outside of braces B and C, mark where each cut will be made. Cut two of each and assemble as shown, using construction adhesive and one screw per joint.
7. Bevel legs.
If desired, bevel the ends to set flush on the ground. Otherwise, leave as is, and conceal the ends with soil in the garden.
8. Finish.
Remove tack strips. Smooth rough edges of obelisk with fine sandpaper, and finish if desired.
1. Make angle cuts. Mark the 10-degree angles at the top of each of the four legs (A) with the protractor and pencil. Mark two adjacent sides of each leg. Then make two cuts on each leg to create the angles shown.
2. Join legs. Lay two legs on a flat surface with the tops joined. Glue with construction adhesive and screw the tips together. Do this by screwing in one screw from the left side of the wood through the joint and the other from the right side of the wood through the joint. Then glue and screw the other two legs following the same method.
3. Measure and mark. Measure 15 inches up from the bottom of all four legs and make a small mark. Measure up another 15 inches and make another mark. (Tip: Tack a small piece of wood across the bottom of the legs to hold the legs steady while measuring and marking. Do not place tack piece where parts C, B, D, or E will go.)
4. Cut horizontals. To make pieces B and C, position a length of 1x2 just below each mark. Using the outside of the leg as a guide, mark lines on the 1x2 to show where to make the cuts for each piece. Cut, following the marked, slightly diagonal angle for the leg. Using these as patterns, make one more of each for the other side of the obelisk.
5. Attach horizontals. Attach B and C to the first pair of legs using construction adhesive and one screw per joint. Repeat with the second pair of legs. Set both pairs of legs upright and screw them at the top. Measure, making sure legs are an equal distance apart.
6. Add more horizontals. To make pieces D and E, take a piece of 1x2 and hold it in place. Using the outside of braces B and C, mark where each cut will be made. Cut two of each and assemble as shown, using construction adhesive and one screw per joint.
7. Bevel legs. If desired, bevel the ends to set flush on the ground. Otherwise, leave as is, and conceal the ends with soil in the garden.
8. Finish. Remove tack strips. Smooth rough edges of obelisk with fine sandpaper, and finish if desired.
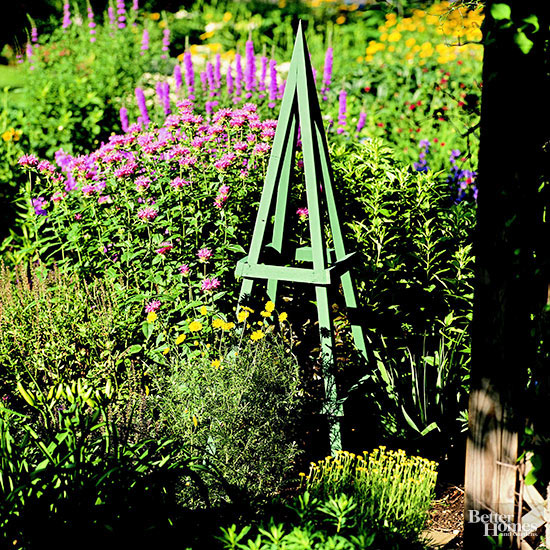
For a natural, weathered look (gray cedar), apply wood preservative or wood-tone stain. If you prefer to paint the obelisk, apply exterior-grade primer first, followed by a coat of exterior-grade latex. After it's dry, tuck your obelisk into a garden bed and admire your handiwork.
Copyright © www.100flowers.win Botanic Garden All Rights Reserved