


How do you border a large backyard with flowerbeds without spending a fortune? You can start with just a few perennials, let them grow, and then divide them. It's good for the plant, costs nothing but time, and is one of the easiest ways to fill your landscaping. Novice gardeners, don't be afraid to rip up your plants! I'm going to show you how easy it is to make new plants from your existing beauties. I'll give some tips for good results and a list of perennials you can divide just like this.
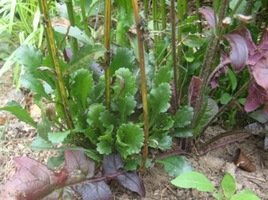 Many flowering perennials (plants that grow back each year) eventually form large clumps by making new stems that creep out at ground level into the dirt or mulch around them. To divide a perennial means to take a large plant and make several smaller ones, called divisions. Essentially, you pull apart clumps into pieces that will continue to grow. The key requirement for the divisions is that each one needs some green top growth attached to some roots. Roughly equal proportions of these two parts gives your division a good chance of recovery. Let me show you how I easily divided an Ox-eye Daisy.
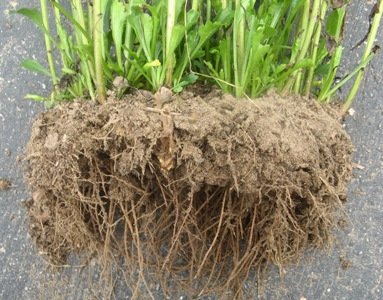 Here's the plant I want to divide. My garden is thriving and the Ox-eye daisy was squeezed in between a Salvia and some Iris. I'm going to move this daisy, so all three flowers can have room to grow. Notice the many stems coming up from the soil and many fine roots below. This is a good sign that I can seperate this clump into divisions.
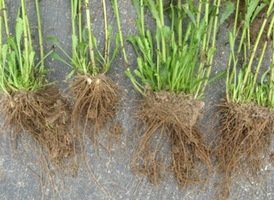
I've pulled the daisy apart into several smaller chunks, each about the size of a perennial plant at a nursery. I'll also cut off the top about halfway down. This helps balance the top to the bottom and gets rid of long stems that would be blown about as the plant tries to get rooted. Use fist-sized chunks that look healthy.
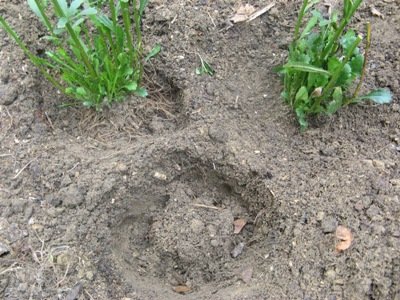 Now make holes where the new divisions will go. Here's a sunny spot ready for three new plants. In the front, I have a hole with a mound of soil in the middle. I did this because the daisy divisions had a lot of loose, dangling, bare roots. Roots that are spread out around a soil mound will enjoy lots of moisture, nutrients, and open ground to expand into. (If your divison ends up with roots in nice clumps of soil, leave it that way and plant as if you had just taken it out of a pot.) At top left, the plant is placed with its roots fanned out around the mound. At top right, soil is filled in and I'm all done.
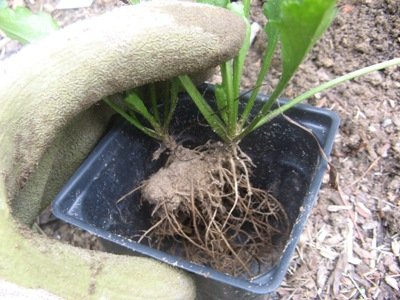 But look- I had a fourth piece. I could have tucked it alongside one of the bigger divisions, but instead I'm potting it. It can grow in the pot and maybe later I can give it away or trade it for something else. For small pots I change my root technique. I hang the roots down. I fill one triangular half of the pot with soil and lightly press it in. Then I fill the other side and press it all in. These roots are now nicely surrounded by soil.
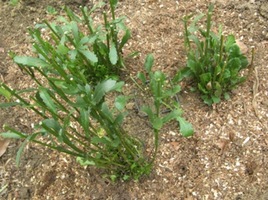 After watering and mulching my "new" plants, I'm ready to show them off. Here's my refreshed Ox-eye daisy, with room to spread. The baby in the pot will be content "planted" right in the middle, until it's adopted out.
What a quick, easy, and satisfying job! This is a fifteen minute, at most, task (unless you stop to peel of your gloves and take a pictures seven times!) If I‘ve made three new five-dollar plants in that time, I'm earning sixty dollars an hour.
A few tips for successful dividing:
These common perennials will divide easily like my daisy:
So, new gardener, grab your gloves and shovel. Dividing a perennial plant is simple to do, healthy for the plant, and a treat for your wallet.
~*~ ~*~ ~*~ ~*~ ~*~
Note: The daisies I divided here are the same as the kind in the article Ox-Eye Daisies: Picking Flowers for My Mom, by Jill M. Nicolaus, (critterologist). It's linked to the first highlighted words Ox-eyes in this article.
References
Flew, Janine, editor. Encyclopedia of Annuals and Perennials, San Francisco, Fog City Press, 2002.
The list of easy perennials was part of a list found in the very informative Clemson University Home and Garden Fact Sheet, "Dividing Perennials."
All pictures were taken by the author.
Copyright © www.100flowers.win Botanic Garden All Rights Reserved