

In just 6 months the ratty tatty almost barren backyard shown in The Gardening Challenge, could look as pretty and productive as any successful and beautiful garden.
You don’t believe it? Maybe you’re thinking along conventional gardening lines. Suspend your disbelief for a while.
Your first problem is tired soil. Your plot will have been subjected to a continuous rain of soot – which will have made the soil too acid to grow much that is worthwhile – and to the dirt from the fumes of internal combustion engines – mainly lead – which will have killed off much of the life in the soil itself. The nearest thing to fertilizing the soil will have been done by the usual array of local stray cats. Furthermore, from sheer lack of attention your soil will have become so compacted that drainage is non-existent. All of which means that your soil will be too acid, too infertile and too compacted to grow anything other than the most pernicious and persistent of weeds. If the previous owners of your property were of the non-gardening sort, chances are that you will find just below the top couple of inches of soil a curious array of miscellaneous rejected building materials – bricks, tiles, concrete lumps and so on deposited there during building. There’s nothing there to get the plants growing.
We start revitalizing the soil by feeding it with moss peat, because it’s easy to buy. Later we’ll put compost on it – compost we make ourselves in the garden. We’ll tell you how. But starting that compost bin for later use is one of the first things to do.
Then we start a crash programme to get quick-growing foliage cover and colour into the garden. Take a colour shot of your garden as it is now, so you can compare it with later snaps as work progresses.
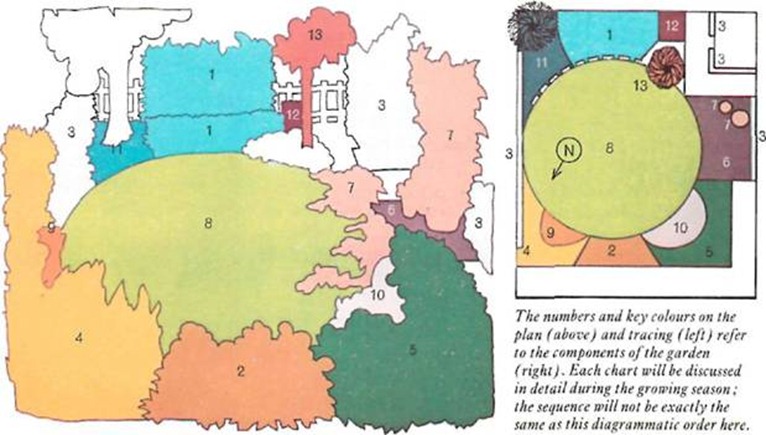
Below there is a plan of a garden, and a view of the garden seen from the house. Relate the numbers on the plan to the numbers in the view – then look up the number in the text below to find what it represents. The plan is designed to be adaptable to almost any small garden. If it’s very long and thin, simply double the plan, dividing the two with a hedge or screen with an arch in the middle. Draw your own plan in rough: then colour key it into the master plan as shown here. Keep the colours the same, the numbers the same. Each number/colour is the major project of one of the 13 fortnights in the first 6 months in your garden. Stick to the same number/colour coding and you’ll have a garden as pretty and productive as this at the end of stage 13.

1. A bean bed can provide not only fresh vegetables for the kitchen – three crops in the case of our particular garden, broad, French and runner – but also put life back into worn soil by assisting nitrogen fixation while creating dense, rapid-growing foliage cover along a fence.
2. The annual bed should create a splash of ‘instant colour’ in the foreground of your garden. Later we list a selection of cheerful hardy annuals and explain how to plant the marigold and the Shirley poppy.
3. Covering vines provide the solution to bare walls and such eyesores as boiler-houses and oil central-heating tanks. Our third instalment shows how to plant convolvulus and ornamental hop – two really fast vines.
4. Our summer display bed sports one annual, the sunflower, and a popular perennial, the butterfly gladiolus, a corm. We shall list alternatives – the sunflower performs best against a warm sheltered wall; we have selected the gladiolus to show how to plant, and later how to raise and propagate corms.
5. Our autumn display bed provides an opportunity to learn about, and how to care for, different sorts of plant: a tuber, the dahlia and a root clump, the Korean chrysanthemum.
6. The patio is what people tend to call the patch of concrete outside their French windows. We think that sitting in the garden should be literally that – sitting in it, and so we show how to lay the base of our patio so that it breaks up the line of the path along the fence.
7. Patio paving is a heavy task, building on the preparation carried out before and seeking to blend the paved area and lawn.
8. The lawn could be left uncut. It would stand up better to children playing on it if left shaggy. But we have included a regular shave in our weekly timetable, and have altered its shape drastically – though not until the eighth instalment and 16th week; by then you should know if you want to go past the point of no return. The faint-hearted could just round their lawn edges into curves.
9. Summer bedding plants, in our case French marigolds and nasturtiums (nice in salads), are bought as young plants and planted to enliven odd dull corners and gladioli.
10. Our vegetable patch should be decorative as well as nourishing: lettuces, carrots, radishes and onions planted round a tropical-looking marrow or gourd.
11. Our cottage/perennial garden corner is a gesture at rusticity where tree roots make deep digging difficult: periwinkle running to the edge of the lawn, where thymes and sedums are planted between paving-stones the mower can run over.
12. A compost heap is the heart of a good garden, but if you have little space to play with, or byelaws limit you, you may decide to throw all your plant waste away and rely on artificial fertilizers.
13. An ornamental tree rounds off our first six months work. It is one of the few permanent fixtures in a planting programme designed to show how rapidly a barren garden can be rejuvenated during the spring and summer growing season. If left, much of this garden as it stands will die down through the autumn and winter and will need replanting again next year. Since our ultimate aim is a garden that will, on the whole, require little maintenance and replanting, we must now move on to consider the long-term strategy that will give our garden permanent shape.

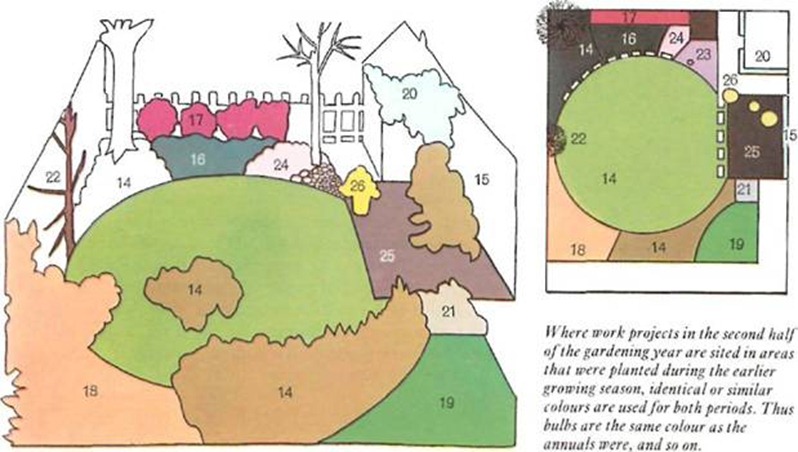
14. Bulbs provide the focus of spring colour: tulips in our former vegetable patch; daffodils and hyacinths where the annuals were; and bluebells in the patio pots. Our garden has been designed so that these areas provide displays of changing colour – bulbs in spring, annuals in summer and autumn – but gardeners wishing to avoid replanting could simply naturalise bulbs like crocuses in the lawn and permanent beds.
15. Trellis provides a framework to mask our shed and give privacy. This is quite an expensive investment and one of our winter tasks will be to put it up securely so that wind, cats and heavy plants cannot bring it down.
16. Permanent ground-cover – we select nepeta (catmint) from the possibilities we discuss. This occupies our former bean bed, and runs from the periwinkle planted in our cottage-garden corner to the rockery we shall site near our ornamental tree.
17. Our living hedge is a Cotoneaster simonsii, an evergreen wall of colour across the end of the garden. Its berries will attract birds, so gardeners with vegetables to protect may prefer to select one of the other varieties we shall suggest.
18. The shrub bed occupies the site of our summer display bed and has been designed as a corner that will be of year-round interest. A flowering quince and a rhododendron are shown here with their spring flowers. The evergreen mahonia will produce yellow flowers during the late winter and spring when the berberis and viburnum will also come into their own.
19. The herbaceous border is a bed of plants that will last for more than one season, most of them being perennial. In addition to the Korean chrysanthemums and dahlias planted earlier in the year, we shall transfer to this bed the butterfly gladioli corms and plant pyrethrum, scabious and coreopsis. Rather better results will be achieved if you take up and replant the roots every three or four years.
20. Climbing roses and Clematis montana provide permanent cover and delicate flowers on our trellis.
21. A herb bed, grown from seed indoors and transferred outside, provides an aromatic fringe to the patio.
22. A fan espaliered tree (any fruit tree whose branches are trained outwards to spread across a wall) can be bought ready trained. Correctly sited and planted it should yield good fruit.
23. Decoration can range from pebbles to marble cupids – our budget limits us to the former – scattered amid aubrietia and alyssum round the base of our ornamental tree. Big spenders can, of course, take up any of the decorative ideas that will be featured in Part Two.
24. Our rockery/rock garden is a modest affair making use of earth excavated from our patio and tree-planting activities. But we shall show how to make dramatic use of rocks and plants, even on a small scale.
25. Container plants are the only type of vegetation that can enliven an increasingly common type of town garden – the paved or gravelled yard. Properly prepared, planted and watered, outdoor pot plants can yield exciting, colourful results and we suggest several varieties: balsams and begonias, trailing nepeta, lobelia, campanula, Canary creeper and, as a change from the upright variety, the ivy-leafed geranium that flops most enticingly.
26. Christmas-present plants need not go into the dustbin after Twelfth Night. Azaleas, hyacinths, winter cherry, and other gift plants can be brought out to enhance a patio or ornamental bed.
Copyright © www.100flowers.win Botanic Garden All Rights Reserved