

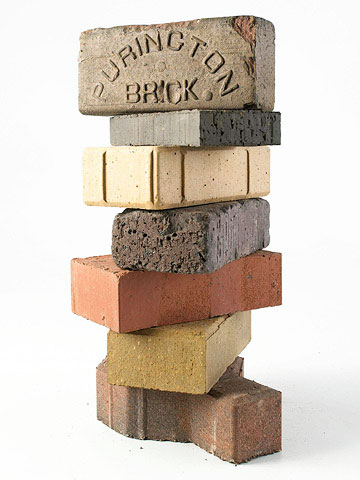
Not all bricks are alike. Paving bricks are harder than the others because they're fired at a higher temperature -- and this makes them more suitable for paving. When you buy new brick, you know what you're getting. But when you buy reclaimed brick, be sure you confirm you're buying true paving brick. Pavers are often larger and sometimes have a shiny surface (especially the oldest ones), and may have type imprinted on them, but not always. If in doubt, knock two bricks together. Pavers will have a bit of ring to them. Softer bricks will make more of a thud.
You will also find a variety of colors, as well as tumbled and beveled bricks, that offer a slightly different style. The bricks used in the project illustrated here are Bourbon Street pavers from Boral Bricks (www.boralbricks.com). Concrete pavers, though not the same thing as brick, come in similar shapes and sizes, and are installed in much the same way, so you may wish to consider this alternative.
continue reading below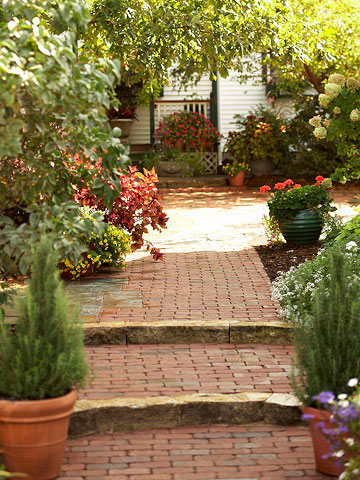
Many people make brick patios too small because they underestimate how much space they'll need for furniture. To avoid this pitfall, take the actual furniture you plan to put on your new patio and place it where you think you'll want it to be. Walk around the furniture, scoot chairs back -- in short, use it like you normally would -- and gauge how large you think the space needs to be. Then use spray paint to mark the perimeter of the patio.
Paths should be at least 3 feet wide, but you'll appreciate a 4-foot-wide path a lot more. Use the path to connect entrances (to your home and garage, for instance) and different areas of the yard. A brick path can unify spaces outdoors the same way flooring does indoors.
Installing brick is one of the more laborious outdoor projects you can attempt, and it's important to approach it realistically. Many homeowners see a patio or path as a weekend project. Often, that's overly optimistic (certainly, for larger projects). But if that's your goal, have all the planning done beforehand, and do all you can to reduce labor: Rent a tiller to loosen soil so it's easier to excavate, a vibratory compactor rather than a hand tamper, and a masonry saw for easy brick cutting. When you have material delivered, have it placed as close to the work site as possible. (Unless hauling 20 wheelbarrow loads of paver base across the yard sounds like a snap!) And if you can recruit help, do so.
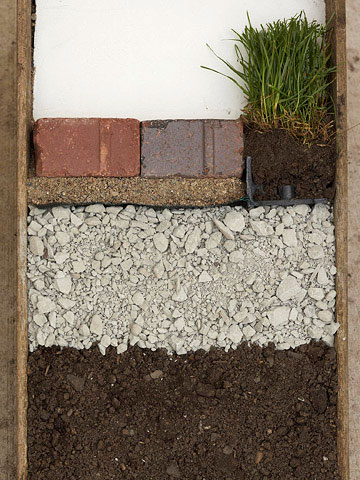
The key to a long-lasting brick surface is a proper base. Scraping off lawn, then laying brick over a couple of inches of sand is a sure way to create an uneven, unstable surface. Four to 6 inches of paver base, a gravellike material that your pavers sit on, will provide a solid foundation on which bricks will stay firmly in place for many years. The ultimate goal is to achieve an installation that looks like this, in cross section.
A good installation consists of 4-6 inches of base and 1 inch of sand topped by bricks. That's about 8-10 inches total. You need to excavate that far below what you want the finished brick surface to be, and several inches beyond where the edges will be. Try to avoid digging too deep and having to backfill; this can create pockets of soft soil that can settle, creating dips in the paving. If you do have to backfill spots, compact them before laying base.
Step 2: Spread the Base
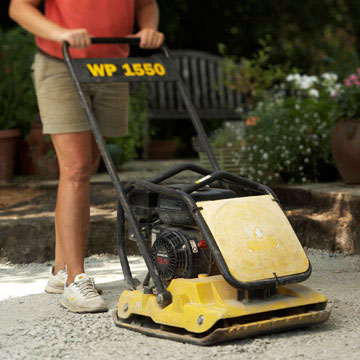
Spread the paver base evenly and pack it thoroughly with a compactor. A hand tamper is adequate for small areas, but for large areas a vibratory compactor means far less work.
It's best to apply half the base, compact it, then apply the rest and compact it again. To achieve a smooth final surface, use a rake to fill in low spots with more base or shave off high spots, and continue to compact the base until the entire area is smooth and even. Laying landscape fabric over the compacted base before adding sand gives the installation more stability.
Step 3: Add Edging
Use plastic edging to define the perimeter of your paving, whether it's straight edges or curves. Hold it in place with stakes.
Step 4: Level the Sand
Where you want to begin laying brick, set two lengths of 1-inch PVC pipe a couple of feet apart. Then add about 1 inch of sand over this area. Slide a straight board across the pipes to create a smooth bed of sand 1 inch thick. Do not compact it.
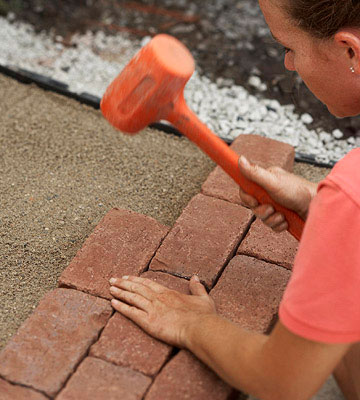
Place bricks one at a time in the desired pattern. As you work, use a level to spot bricks that are slightly higher than surrounding bricks -- tap them with a mallet to set them lower into the sand. If a brick sets slightly lower, remove it, add a bit of sand, and replace it. Continue placing bricks in this fashion, saving the edge pieces for last.
Step 6: Create Nice Edges
You can use a chisel and hammer to cut brick, but it's far easier to use a masonry saw. Rent one at a tool rental outlet. Measure each brick piece individually, make the cut, and place the brick with the cut end on the outer edge.
Step 7: Tuck It In
Spread a light layer of sand over the paving. If you still have the compactor, use it on top of the brick (with the light layer of sand still present). Sweep the sand around so it fills the small gaps between bricks.
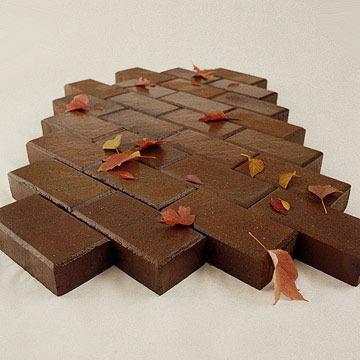 Running bond
You can use any of several patterns when you lay brick. Classic patterns include basket weave, running bond, stack bond, and herringbone. Your choice is largely a matter of personal preference, though the patterns that can give you a straight edge without cutting (basket weave and stack bond) might require a bit less work depending on the shape of the area you wish to pave.
Copyright © www.100flowers.win Botanic Garden All Rights Reserved