Tabletop Gardens
Tabletop gardens typically combine a shallow container with petite plants or dwarf varieties and, if you like, other pipsqueak features -- a miniature gazebo, pebbled path, and decorative doodads -- to make an enchanting scene that rewards curiosity.
The plants we've chosen, although not all true miniature or dwarf varieties, are diminutive growers that will suit a small garden for at least one growing season. If plants grow too big for the space, simply trim them back. In warm climates, enjoy your container garden outdoors year-round.
Where winters are cold, store the garden in a protected place, such as an insulated garage, when freezing temperatures loom.
See all four of our mini-projects for attainable dwarf landscapes!
continue reading below
Tray Garden
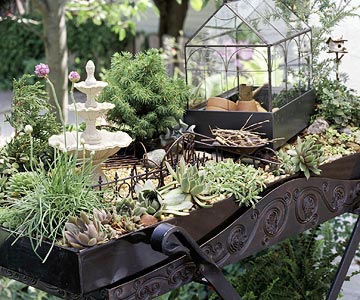
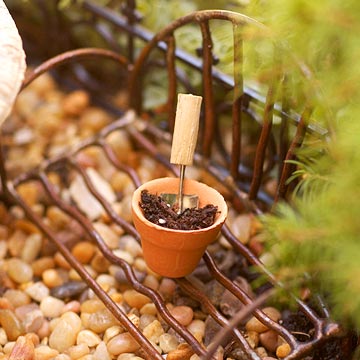
Transform a large tray and a collection of small-scale plants into an enchanted landscape. From the teeny-tiny glass house to itty-bitty tools and thimble-size pots, the design works as a study in detail.
Set it on a sturdy plant stand or in the middle of a dining table for a captivating scene. Make a similar landscape in a smaller tray to fit a windowsill or shelf.
Materials
- 13-x-30-x-2-inch metal boot tray
- Hammer
- Awl or large nail
- Pea gravel
- Coarse sand
- Potting mix
- Tabletop terrarium
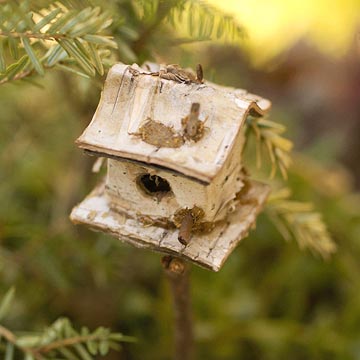
- Miniature fountain, fencing, benches, garden tools, and pots
- Aquarium gravel
- Plant stand
- Sawara cypress (Chamaecyparis pisifera 'Cannon Ball')
- Thrift (Armeria spp.)
- Hens-and-chicks (Sempervivum 'Sanford Hybrid' and 'Cobweb')
- Alpine white spruce (Picea glauca 'Witches Broom')
- Stonecrop pink spurium (Sedum coccineum)
- Stonecrop (Sedum makinoi 'Ogon')
- Dwarf wintercreeper (Euonymus 'Kewensis')
- Bronze Dutch clover (Trifolium repens 'Atropurpureum')
- Dwarf Canadian hemlock (Tsuga Canadensis 'Burkett's White Tip')
Directions
- Using a hammer and awl or large nail, poke holes for drainage about every 6 inches in the bottom of the metal tray.
- Cover the bottom of the tray with a 1/2-inch-deep layer of two parts pea gravel and one part coarse sand. Top with a layer of potting mix, mounding it at least 2 inches deep.
- Add plants, beginning with the largest specimens (dwarf conifers and succulents) and filling in with alpines and ground covers. When planting, gently loosen root balls and shake loose extraneous soil, if necessary, to tuck the roots into the potting mix. Leave room for pathways and your selection of miniature features, such as a glass house (tabletop terrarium), fountain, and other accessories.
- With the plants and furnishings in place, sprinkle aquarium gravel over any exposed potting mix to prevent erosion.
- Water thoroughly after planting; thereafter, water only when the potting mix feels dry.
- To prevent damage to furniture, place the container on a waterproof tray before setting it on your plant stand or table.
- Place the garden in a lightly shaded area where it will not bake in the sun.
- In cold climates, move the tray indoors for winter. A cool room with bright light is best.
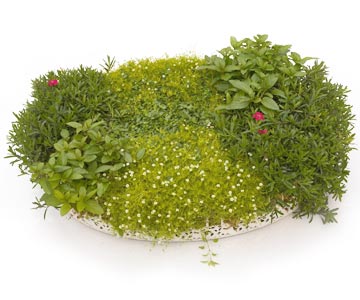
Tabletop Garden

Use ground covers to create an astonishingly lush tabletop. Creeping ground covers form a flat, firm surface, while sprawling plants spill over the edges.
In about a month, five 4-inch plants, split up for planting in a pattern, will cover a 21-inch-diameter tabletop.
Materials
- Steel-wire plant table
- Landscaping fabric
- Moisture-retentive crystals
- Potting mix
- Log moss
- Corsican mint (Mentha requienii) -- top left and right
- Prostrate peppermint (Mentha piperita) -- center
- Gold Scotch moss (Sagina subulata 'Aurea') -- left center
- Maiden pinks (Dianthus deltoides 'Brilliant') -- right front
Directions
- Line the tabletop with landscaping fabric, tucking and folding it to fit.
- Blend moisture-retentive crystals with potting mix according to package directions. Fill the tabletop with potting mix.
- Tuck log moss in between the tabletop and the landscape fabric to camouflage the fabric and give the table a softer look.
- Nestle the other plants into the potting mix, planting at the same level they grew in their nursery pots.
- Situate the table in a sunny place. Water thoroughly and regularly to keep the soil moist.
- Trim sprawlers regularly to keep them growing low and lush.
- If you live in a cold-climate region, lift the plants out of the tabletop in early fall and transplant them into the garden. That way they'll provide you with divisions for replanting in spring.
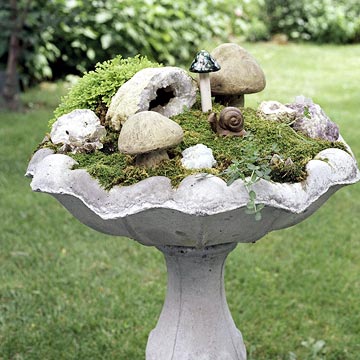
Moss Garden
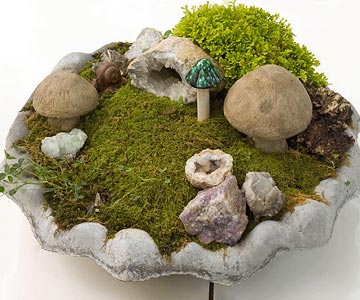
Escape into a lush and tranquil realm, reminiscent of a forest floor, where mosses flourish and mushrooms sprout.
Designate this textural garden as an ideal place to display a few geological treasures, gathered on a trip or saved for special memories they hold.
Set the planter in a shady spot where the mosses will thrive, given consistent moisture. Set the basin on a tabletop or bring the garden closer to eye level by putting it on a pedestal.
Materials
- Concrete birdbath (with separate basin and pedestal)
- Pea gravel
- Moisture-retentive crystals
- Potting mix (that contains fertilizer)
- Geodes and decorative stones
- Decorative mushrooms and other ornaments
- Clover (Trifolium spp.) -- on the left
- Log moss (Neckera complanata) -- in the center
- Club moss/trailing spikemoss (Selaginella kraussiana) -- on the top right
Directions
- Cover the bottom of the birdbath basin with a 1-inch layer of pea gravel.
- Blend moisture-retentive crystals with potting mix, according to package directions. Fill the basin with potting mix, mounding it up to 4 inches above the rim.
- Cover the mound with a blanket of fresh log moss and a sprig of clover, if desired. Leave room to plant the club moss (or trailing spikemoss).
- Place decorative rocks, ornamental mushrooms, and other natural-looking accents here and there, nestling them into the moss so they won't tumble out.
- Use club moss as an accent planting, positioning it behind the large geode.
- Shower the garden regularly to keep it moist, green, and lush.
Basket Garden
Think of this basket of mints as a multipurpose garden: edible, portable, and even a source of entertainment.
Placed atop a copper tray and wrought-iron stand, it's ready for serving refreshments at your next outdoor get-together. Move the basket to a dining table and use it as a centerpiece or as a dessert tray.
Either way, it helps you serve a little surprise with a touch of elegance, whether you snip the plants for aromatic garnishes in drinks or mince and sprinkle the bits on desserts.
Encourage guests to pinch off and whiff the mints for an uplifting ritual after a meal. Stimulate conversation by guessing the mints' flavors. And if mint isn't your cup of tea, so to speak, you can substitute other sweet-flavor herbs.
Materials
- Tote basket
- Coarse-grit sandpaper
- Exterior stain and paint
- Paintbrush
- Landscaping fabric
- Potting mix
- Plants
- Copper serving tray and stand
- Spearmint (Mentha spicata) -- top left
- M. 'Juicy Fruit' -- top center
- M. 'Crispa' -- center
- M. 'Kentucky Colonel' -- top right
- M. 'Pineapple' -- right front
- M. 'Banana' -- left center front
- M. 'Chocolate' -- left front
Directions
- Give the basket a dark, coppery finish that coordinates with the tray by first roughly sanding the outside of the basket and then brushing on dark gray or black exterior stain and dabbing on sienna and copper outdoor paints. Let dry.
- Line the basket with landscaping fabric, tucking and folding the corners and curves. Fill the basket at least halfway with potting mix.
- Plant a selection of mints, covering and filling in between the root balls with potting mix. (We started with a 17-1/2-inch basket and one of each mint variety in 3-inch pots.)
- Water thoroughly after planting. Keep the basket -- on a copper serving tray atop a plant stand -- in partial shade, where mints thrive.
- Water regularly to keep the soil moist. Snip the herbs regularly to keep them looking lush. If flowers begin to form, pinch them off.
- At the end of the growing season, take cuttings of the plants and grow them indoors over winter for a set of new garden-ready plants come spring.

