

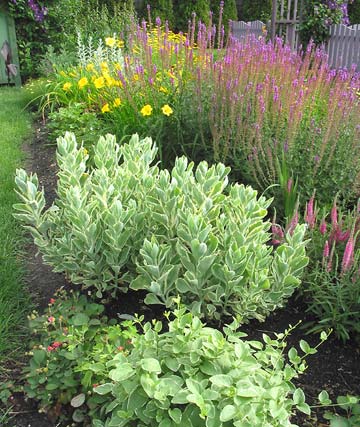
 Compost is the secret
ingredient in most of
the most productive
gardens.
Compost is the secret
ingredient in most of
the most productive
gardens.
With the help of earthworms and microorganisms, you can turn leaves, kitchen scraps, small branches, and other plant debris into rich compost -- the most effective soil amendment there is. Best of all, it's free. Composting is one of the easiest of all gardening chores. Doing it properly means having the right size composter in the right place and feeding it the right stuff.
In this guide, we'll explain how composters work and provide you with ideas and plans for several types you can build yourself.
continue reading below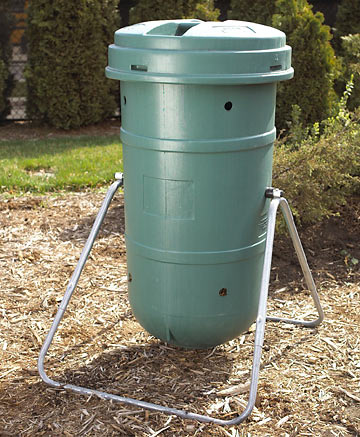 Commercial composters
do a good job, but may
be expensive and have
limited capacity.
Commercial composters
do a good job, but may
be expensive and have
limited capacity.
Consider these parameters when deciding where to put your composter. It needs to be where it is not visually obtrusive and not upwind. Site it in a convenient spot; you don't want to travel far in the winter with kitchen debris. It's helpful if the composter is close to where you will be using the compost, such as the vegetable garden or potting bench. If you are using a composter that requires daily attention, put it where you can see it. That way you will be more likely to turn it as often as recommended.
 If you don't have a
shady spot for your
composter, consider
adding a roof.
If you don't have a
shady spot for your
composter, consider
adding a roof.
The ideal size for a compost bin is 3 feet high, 3 feet wide, and 3 feet deep. One compost bin may not be enough for your needs, so you should know how much debris you generate. Track the amount of biodegradable kitchen waste (vegetable matter -- no meat, bones, or cooking oil) and yard waste you generate in a month during the growing season. To do this, get the largest plastic trash can you can find and put all your waste into it. When it fills, dump it where the compost will be. Keep track of how many times you empty the trash can in a month, and use that figure as a guide for determining the number of compost bins you need. As a rule, have room to store two months' worth of debris per bin. With three bins, by the time the second one is full, the first one will be delivering compost and the third one will be ready to fill.
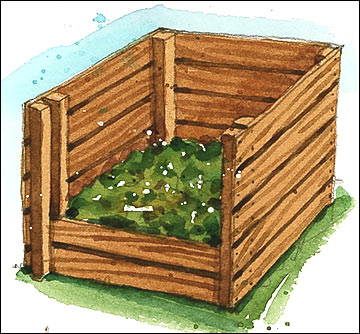
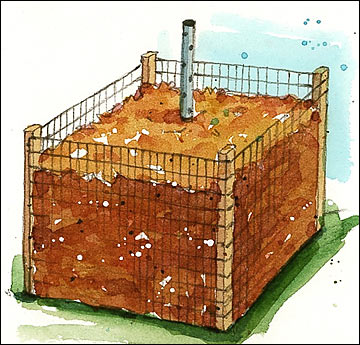 Wire-framed composter
This is one of the simplest types of compost bin you can make. Dig four 2-foot-deep holes for four 6-foot 2x4s so they form a square 36 inches on each side. Set the posts in place with concrete or tightly pack soil around each post.
Decide which side will be the gate. Using wire staples, attach turkey or chicken wire fencing on the other three sides; hammer the staples in firmly. Cut a piece of fencing large enough to cover the fourth side of the bin. Attach the hinge side of the wire mesh to one post using oversized staples that can go at least 1 1/2 inches into the post. Attach a row of four similar staples to the 2x4 on the other side of the opening, but drive them only partway into the post. To secure the gate, press the fencing against the post so that the partially driven staples protrude through the holes in the fencing. Then slide a dowel or metal rod through the staples to hold the gate shut.
To speed up the composting, set a 4-inch-diameter piece of PVC pipe with holes drilled into it in the middle of the pile. The pipe helps add moisture and air.
 Slatted composter
Set the posts as you did for the wire-frame composter. Use cedar, redwood, or other rot-resistant 2x6s to box in three sides, leaving a gap of at least 1/2 inch between boards to allow for air circulation.
To make a channel for the gate, use six 3-inch wood screws to attach a vertical 2x6 flush with the outside edge and top of each front post. The 2x6 will extend about 2 inches beyond the front edge of the post. Along the inside face of each front post, use six 3-inch wood screws to attach a 2x2 so that it is flush with the top of the post and spaced so it leaves a 2-inch gap between the front edge of the 2x2 and the back edge of the 2x6.
Measure the inside distance between the front posts, subtract 1/2 inch, and cut enough 2x6s to close the front opening when the 2x6s are slipped into the channel.
A 4-foot-square heavy plywood floor makes collecting the compost easier.
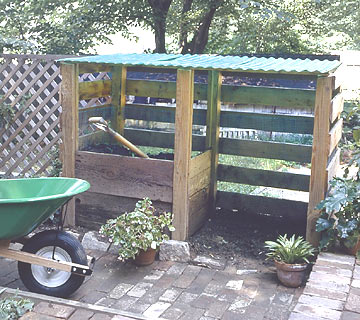
 Tiered bin composter
This bin is built like the slatted version described at left. The only difference is that the bins share a common wall. You can make a series of bins side by side so that when turning the heap, you dump the contents of one bin into the bin beside it.
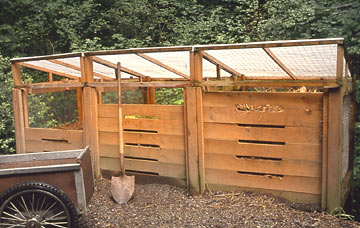
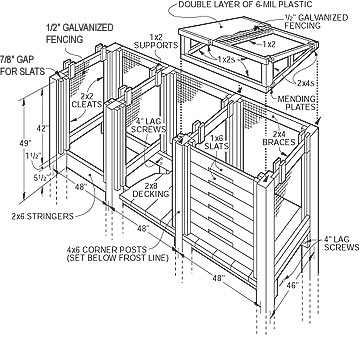
If you're looking for a top-drawer composter, consider the unit shown here. This version includes three bins for more convenient harvesting of finished compost. It also has roof panels that keep the pile from drying too quickly, while preventing heavy rains from oversoaking the compost.
The plans below offer the information you need to construct this composter. Be sure to use redwood or cedar, which are naturally weather resistant, if you want a long-lasting bin.
Copyright © www.100flowers.win Botanic Garden All Rights Reserved