


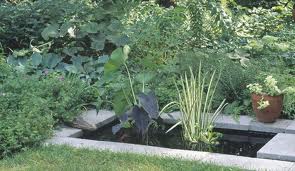
Concrete is a tried, traditional pool method. Modern flexible or pre-formed liners need less skill and present fewer problems, but concrete offers permanence lacking in other methods and blends with traditional landscape materials.
Success requires clear understanding of concrete's properties during construction and limitations from design complexity. Vertical or steeply sloping sides need shuttering to support concrete while setting. Reinforcing rods or mesh are essential; knowledge of expected stresses determines reinforcement type and quantity.
Wet concrete remains workable only briefly—can set in hours. All concreting must finish in one day. Ready-mix arrives regardless of weather in one load—must be placed quickly. Wet weather risks dilution; laying and protecting simultaneously is extremely difficult. Self-mixing with a hired mixer allows choosing a suitable day but makes uniform mix harder, especially with waterproofing compound.
Concrete pools need careful waterproofing. Even well-laid concrete can be porous. A polythene membrane beneath concrete prevents seepage. Alternatively, add waterproofing compound when mixing—eliminates porosity but not faulty workmanship or cracks.
Free-lime escaping into water harms fish and plants. Waterproofing compound doesn't prevent this. Treat concrete face with a special product that traps free-lime and seals via internal glazing.
Winter damage from ice pressure is a hazard. Float a rubber ball or wood piece from first frosts to absorb pressure and protect walls.
Excavate at least 15 cm (6 in) larger all round than finished size for concrete thickness. Set out and dig as for a flexible liner pool. Vertical or >45° sides need sturdy wooden shuttering/formwork to resist concrete pressure—erecting this is a skill; entrust to a professional if inexperienced.
If avoiding shuttering and using polythene membrane, give sides the shallowest possible slope to prevent slumping on smooth polythene.
Concrete can go directly on soil, but polythene liner is better—prevents water seepage and rapid concrete drying (which causes hairline cracks and surface flaking). Builder's clear polythene suffices.
Treat excavation as for flexible liner installation—equal puncture risk. Remove sharp stones and roots; spread sand cushion before laying polythene. Creases aren't essential to remove but install carefully like a pool liner.
Work outward from pool center, spread 10 cm (4 in) concrete layer over entire excavation. Use plasterer's trowel for evenness. Level floor and marginal shelves with board and spirit level. Press wire mesh (poultry netting type) into wet concrete as reinforcement. Top with 5 cm (2 in) final layer—ensure level where needed, polish to smooth finish with trowel.
Cover wet concrete with damp sacking for slow drying. If impractical, water gently several times daily with fine rose—less satisfactory but prevents cracking.
Once set, treat with sealant to prevent free-lime escape—harmful to fish/plants, causes white cloudiness settling on submerged foliage. Sealant is crystalline, mixed with water, painted on; also assists waterproofing.
For colour, waterproof plastic paints give smooth coloured finish and prevent free-lime. Require special primer first for adhesion.
Self-mixing is possible but uneconomical and time-consuming for anything but small pools. All concrete must be mixed and laid same day to avoid weak joints. Consistency vital—uniform materials, especially waterproofing compound.
Home mix: 1 part cement, 2 parts builder's sand, 4 parts gravel. Mix dry to even grey. Add water and waterproofing compound per manufacturer instructions. Mix few minutes; test consistency—shovel ridges should hold shape without slumping.
Ready-mix is better—consistent, waterproofing evenly distributed. Must calculate/order quantity in advance, specify delivery day. Still arrives in wet weather with attendant problems. Be ready to use immediately with good access from delivery point.
Step-by-Step: Concrete Pool Construction
- Excavate hole 15 cm (6 in) larger than finished pool; line with builder's polythene to prevent rapid drying.
- From center outward, spread concrete evenly over polythene to two-thirds finished depth (~10 cm/4 in); smooth evenly.
- Tamp firmly, ensure level, then press reinforcing wire mesh into wet concrete.
- Cover mesh with 5 cm (2 in) concrete; finish smooth with plasterer's trowel.
- Cover with damp sacking or water surface to prevent rapid drying and surface cracks.
- Once dry, apply sealant. If using plastic paint, apply special primer first.
Pool Landscaping That Wows: Design Themes, Natural Integration, and Infinity Edges
Designing the Perfect Garden Shed: Function Meets Aesthetics
Lap Swimming Pools & Riverpools: Design, Benefits & Installation
Pool Construction in Toronto: In-Ground Options from Budget to Bespoke
Planning a Flower Garden Design: From Vision to Living Canvas
Solar Pool Heating: Slash Costs & Carbon with Free Sun Energy
DIY Concrete Garden Projects: Planters, Fire Features & Edging
Water Garden Care: A Complete Seasonal Guide
Garden Pond Edgings: Paving, Grass, Planting, Timber & Beaches
Raised Garden Ponds: Benefits, Design Choices & Construction Basics
Creating an Indoor Garden Pool: Tropical Plants and Year-Round Color
Creating a Naturalistic Informal Water Garden
Copyright © www.100flowers.win Botanic Garden All Rights Reserved