

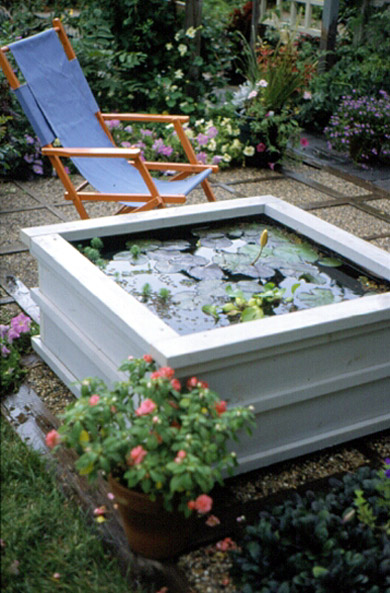
 This water pond is portable and fairly
inexpensive to make.
This water pond is portable and fairly
inexpensive to make.
Note: The finished pond will be approximately 38 inches long, 36 inches wide, and 20 inches high.
Tip: Print this article to get the full set of 16 step-by-step instructions.
1. Download the free plan for this project. Downloading requires Adobe Acrobat software.
Patio Pond plan
Download Adobe Acrobat
2. Make the frame for the base. Cut 2x2s to size and assemble the frame with 3-inch deck screws. To prevent splitting lumber, drill countersunk pilot holes for all screws.
3. Make the base. Crosscut 2x8s to make five 36-inch-long pieces, and place them edge to edge. Mark the last board so the overall width of the base is 36 inches, and cut to size. Put the boards face down on your work surface, center the base frame, and drive 2-1/2-inch deck screws through the base frame into the base. Then turn the base assembly over.
4. Position the base assembly where you want the water garden. Use a level to check the base in both directions, and use tapered wood shims under the base frame to adjust it, if necessary.
5. Make the sides of the pond. Crosscut the eight 2x8 side pieces to lengths shown in the diagram. Using 3-1/2-inch deck screws, assemble the side pieces into two boxes.
6. Put the sides in place. Position the first box on the base assembly, and miter the 1x2 banding to run around its perimeter. Center the banding on the joint line between the box sides and base, and fasten it with 2-inch deck screws. Make sure to drive some screws into the box sides and others into the base. Stack the second box on top of the first.
7. Add two more sets of banding around sides. Add one straddling the joint line, and the other flush with the top of the sides.
 Illustration 1
8. Make a notch for the pump's cord. Cut a 1/2 x 1/2-inch notch at one corner to provide a neat pathway for the pump's electrical cord.
9. Fit the liner into the box. Cut the pond liner to a manageable size. A 66-inch square gives you a 1-1/2-inch allowance on all sides. Put the liner into the box and roughly center it (see Illustration 1).
 Illustration 2
10. Secure the liner. You can divide the surplus into equal pleats on each side or, as shown in Illustration 2, pleat all of it to one side. Then drive a few staples through the liner near the top of each side. Use heavy scissors or a utility knife to trim the liner flush with the top of the sides.
 Illustration 3
11. Add the pump. Position the pump inside the box, and route its cord through the notch (as shown in Illustration 3).
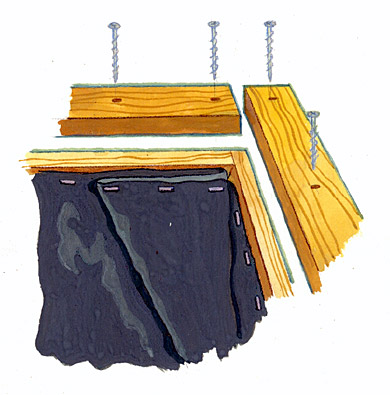 Illustration 4
12. Finish with top banding. Cut the 2x4 cap strips to sizes shown and screw them into place (as shown in Illustration 4).
13. Double-check the location and level of the completed box before adding water. Full sun is best.
14. Fill the pond with water from a garden hose. Once it's filled, you won't be able to move the box without draining it, as the water alone weighs almost 600 pounds.
15. Add plants and/or fish. Wait 24 hours after filling the container with water before adding the fish.
16. Plug in the pump.
Copyright © www.100flowers.win Botanic Garden All Rights Reserved