Every once in a while, certain flowers/plants need to be repotted. A certain process needs to be followed in order to get it right. Learn how to repot orchids through this article.
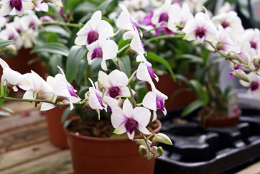
Every orchid genus needs to be repotted so that it flourishes well. It is important to have the right medium of repotting for each kind of orchid. This depends on whether it is terrestrial or tree-dwelling. The soil used for repotting usually includes tree-fern fibers, perlite, coconut husk, sphagnum moss, and often a mixture of two or three of these. Orchids that are potted in a typical bark medium, need to be repotted every 18 to 24 months, depending on the requirements of each type.
The primary motive behind repotting orchids is to provide them with fresh media to grow, and not just a huge pot. But, the pot size should be chosen according to the size of the roots. Orchids love fitting a little tight in their pots. Thus, you will find that repotting orchids in unnecessarily large pots will not show any fruitful results.
Reasons and Prerequisites
If an orchid is allowed to grow in the same pot for a long period of time, it will flower poorly and may eventually die. There are two ways to identify the need for repotting. The first one is, if your plant has outgrown its pot, and the second one is, if the growing media has broken down. If the plant appears to be soppy and mushy and does not drain freely, you should know that it is time to repot so as to change its medium and prevent its roots from rotting!
You may use plastic, clay, or even decorative pots. The type of pot you select, will affect the frequency of watering. If it is in a clay pot, it will require more and frequent watering, as they have a tendency to dry out faster. If orchid roots have been left in contact with standing water, they tend to rot and die, ultimately killing the plant. Therefore, make sure that you always choose pots that have drainage holes. The soil in the center of a large pot may remain damp or wet for a long time and become an unhygienic environment for roots. You can avoid this by placing small pieces of
Terra cotta right at the base of the pot. Certain varieties of orchids are capable of photosynthesizing through their roots. Such plants are often kept in transparent and clear pots, so as to allow sunlight to get to the roots.
Steps to Follow
Step 1 - Unpot Your Orchid
Fair warning, repotting orchids can be a messy task. So, before starting the procedure, I would insist you spread sheets of newspaper in the area where you will be working. Firstly, turn the plant upside down and start ponding the sides and the bottom of the pot, so as to remove it. The roots will often stick to the pot and will make the shifting very difficult. In this case, you can use a clean kitchen knife to loosen the sticky roots. Remember that, no harm will be caused to the plant if by chance you accidentally damage some roots. Once the plant is out, you should pry the roots apart from them and shake off most of the old potting mixture. Some of it might cling to the roots even at this stage, but you needn't worry about that either.
Step 2 - Organize your Repotting
Trimming the roots is an essential and very important step before you actually repot the plant. Consider using heavy scissors and have a sharp knife in one hand. You must sterilize each of your cutting tools to prevent a spread of viral disease. Tools can be sterilized by wiping them with a cloth that has been moistened with rubbing alcohol. Any kind of dead, damaged, or destroyed roots should be immediately removed. Dead roots are mushy, soppy, and light brown in color, while healthy roots are white with light green tips and are firm to hold. You should also chop off any leafless pseudo bulbs at this stage. If you find more than one new growth or lead, you may split up the orchid plant by cutting it through its root stalk. Every section must have three pseudobulbs and a new lead.
Step 3 - Repot the Orchid Plant
When you repot orchids, make sure you choose a pot that has the capacity to accommodate around two years of new orchid growth. In case you are using an old pot, you must wash it and soak it in a 10% solution of chlorine bleach for about 30 minutes. Rinse it after 30 minutes. Using a new clay pot? Don't worry. Just soak it in water for a few minutes. Orchids require perfect drainage. To acquire the same, consider placing a layer of broken lampblack or plastic foam peanuts at the base of the pot. Before using potting mixture, wet the layer with boiling hot water, allow it to cool down, and then drain it. While you place the section in the pot, place the old pseudo bulbs in such a way that they are against one side, so that any new lead will have enough space to grow and expand. Apply the damp bark mixture near the roots and use your thumbs to make it firm. The top of the root stalk should be leveled with the top of the bark.
Step 4 - Caring for Repotted Orchids
It is very important to keep the orchid plant in an upright straight position, while the new root system is still in its nascent stage. Stake it firmly with a loop of twine, or you can also use "rhizome clip" - a device which attaches to one side of the pot. Do not place the orchid in direct sunlight. Instead, keep it in a place that has enough shade and mist over the plant, until new root growth is visible. Once the roots finish penetrating the bark, you can move the plant in an area of brighter light, after which you can restart fertilizing and watering normally.

