

 Step 1
1. Beginners should start with those perennial seeds that are easiest to start at home: black-eyed Susan (Rudbeckia), catmint (Nepeta), perennial geranium, centranthus, aster, purple coneflower (Echinacea), armeria, snow-in-summer (Cerastium), or yarrow (Achillea).
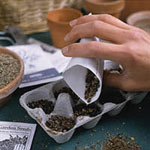
Nearly any shallow container with drainage holes can be used in starting perennial seeds (Check the seed packet to find out what time of year to start the seeds.) Here, a cardboard egg carton with holes punched in the bottom works nicely. Use a potting mix formulated especially for starting perennial seeds. Sprinkle three or four perennial seeds in each section.
Learn more garden seed starting tips.
 Step 2
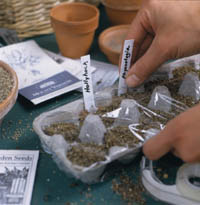
2. If the perennial seed packet instructs you to cover the seeds with soil, sprinkle on 1/8 inch of vermiculite or milled spahgnum moss. Then label each perennial seed starting container. (We cut a white plastic bleach bottle into strips and wrote on it with a permanent waterproof marker.)
Water well, soaking the soil but being careful not to wash out the perennial seeds. This can be done by sprinkling water on the soil with your hand, setting the container in a pan of shallow warm water and waiting until the water wicks to the top of the soil, or watering the perennial seeds with a special bulb sprinkler. Cover with plastic wrap taped to the sides, or slip into a clear plastic bag to create an evenly moist environment. Place the perennial seeds in a draft-free spot that stays at the temperature instructed on the seed packet. Use a thermometer to find out what spots in your house would be suitable.
Click for more helpful seed starting tips.
 Step 3
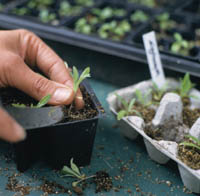
3. Seedlings for most easy-to-grow perennials germinate within three weeks or so. As soon as the perennial seedlings germinate, remove the plastic wrap. Place in the sunniest spot available or under a grow light. When the perennial seeds have grown into plants with several leaves, transplant one each into a larger pot -- we used plastic cell packs -- filled with regular potting soil. Water well, and return to the brightest spot possible. Keep evenly moist but not soggy.
Natural light outdoors helps perennial seedlings tremendously. On days when temperatures are expected to reach 40 or higher, set seedlings outdoors in full sun in a protected spot for a few hours. A cold frame is ideal. Later, when temperatures are in the 50s and above, leave perennial seedlings outdoors all day and take them in at night.
 Step 4
4. After the last frost date, plant perennial seedlings outdoors. Perennials get off to a better start if pampered for a growing season in a nursery bed or favored corner of the vegetable garden. Fertilize lightly a week or two after transplanting. Keep watered and weeded for the rest of the growing season. The plant may bloom its first year, but most perennials don't bloom until their second year. In regions where temperatures dip below freezing, protect the plants in late fall with a loose mulch of several inches of straw or pine boughs. Label so you can locate the plant next spring.
 Step 5
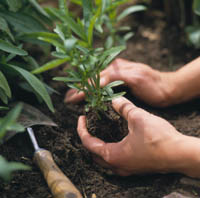
5. The following spring, after the plant has come out of dormancy and is green, dig it up and transplant it to its permanent place. Keep watered the first two weeks or so until established.
Copyright © www.100flowers.win Botanic Garden All Rights Reserved