

Birdhouses have long added a fanciful flourish to the garden. This avian abode with a twist is no exception. It not only provides an inviting home for feathered friends, but it also doubles as a planter to showcase a vibrant display of Mother Nature's finery.
Remember to include scalloped edges to give the planter a more finished look and drainage holes for extra durability. The holes allow water to run through the planter. Without them, water would accumulate inside, making the wood more susceptible to rot.
continue reading below1. Download the free patterns for this project.
House Pattern
Wall Pattern
 This charming planter looks greateven before it's adorned with alush display of greenery.
2. Cut pieces with the table saw, and, as you go, check their fit. Make adjustments as necessary.
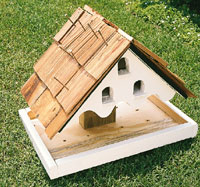
3. Make a pattern for triangular pieces A and B by copying the pattern to 215 percent on a copy machine. Cut out pattern; use it to draw lines for cutting scrollwork and entrance holes on A, aligning long edge of pattern with long edge of board. Cut triangular pieces A and B.
4. Using a scroll saw, cut bottom front edge of A along drawn line. Use a drill to cut a blade-start hole inside each marked entrance hole; cut the opening with the scroll saw.
5. Cut the plywood pieces C and D for the roof. Bevel-cut with table saw right side edge of C and left side edge of D at 45-degree angle to meet at the apex of the roof.
6. Apply a thin bead of weatherproof wood glue to seal beveled edges of roof at its apex; set triangular front and rear walls (A and B) under the roof as it dries to ensure proper fit for next step. Apply a line of glue all along the top edges of A and B. Use finishing nails to attach roof pieces C and D to A and B.
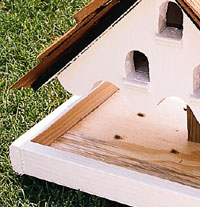
7. Cut E and F. Cut a rectangular notch in E (the floor) to accommodate the 2x4 mount F. Center the notch along the rear surface of the floor, where the 2x4 will extend through the floor and into the house. Drill four 3/8-inch holes evenly spaced through the floor to allow for drainage. Position F so that 4 inches of F is inside the house and 5 inches of it extends from the bottom of the house. Attach F to B by driving deck screws through the back wall into F to secure the mount.
8. Install floor E; it should fit snugly to the mount. Position front wall A to the floor with the scrollwork just below the floor edge; use 3d finishing nails to nail front wall A into the edge of the floor. Nail E to inside of house, using 3d finishing nails; nail through the front A and rear B into the edge of the floor E.
9. Nail the cedar or asphalt shingles to the roof, allowing for overlap at the apex of the roof and slight overhang on the sides. If using cedar shingles, drill pilot holes in shingles, using a 3/32-inch drill bit, as a start for each nail hole to prevent splitting the shingles. Hammer 2-1/2-inch nails to the roof 2 inches apart in staggered rows and jutting up 1 inch, for attaching the moss and plants later (repeat process for making pilot holes to prevent splitting cedar shingles, if using).
 Be sure to drill plenty of holesfor drainage in your base.
1. Cut pieces G, H, and I. Cut eight drainage holes in G before nailing on side and rim pieces. Nail the 1 x 2 rim pieces H to the front and back edges of the base G, with the bottom edges flush. Repeat with side rim pieces I.
2. Center the house over the base and attach the base by screwing it to the bottom of mount F.
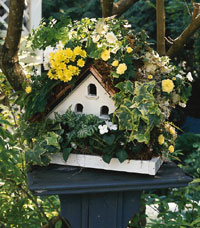 This finished planter looksspectacular with its vibrant coatof blooms and foliage.
1. Paint with exterior paint or stain. Do not paint the floor E or mount F; instead, apply a waterproof sealant before attaching them to the birdhouse.
 Place moistened sheet moss on the
roof of the planter to provide a
hospitable base for the plants.
Place moistened sheet moss on the
roof of the planter to provide a
hospitable base for the plants.
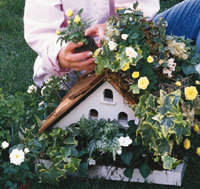
Use plants that have similar light and water requirements. This planter has miniature yellow and white roses, yellow variegated ivy, yellow and white miniature mums, white impatiens, maidenhair fern, and variegated house fern all in either six-packs or 3-inch pots.
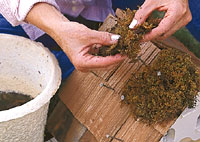
Start by soaking sheet moss in a bucket of water until saturated. Wring out most of the water and attach the moss to the roof of the house by slipping it over the 2-1/2-inch nails.
Immerse plants in their pots in another bucket of water and liquid starter fertilizer (one that contains B vitamins for resisting transplant shock; follow package directions). After the soil is soaked, remove plants from pots and push root balls onto nails on the birdhouse roof.
Cover the bare soil by securing more wet sheet moss around it; use florist picks, if necessary. Plant the birdhouse base the same way, keeping plants along the perimeter of the base. Tuck bits of Spanish moss between plantings.
To keep the planter looking great throughout the summer, water plants using a gentle spray or a watering can every other day and apply a water-soluble fertilizer every other week.
Copyright © www.100flowers.win Botanic Garden All Rights Reserved