Still reeling from sticker shock over the price tag on that beautifully sculpted topiary creation in the garden center? Not to worry--simple indoor or outdoor topiaries can be yours for the price of a potted tree or shrub, a pair of pruning shears, some ribbon, a little courage, and a fair amount of patience.
The Specimen
Shrubs or trees that are suitable for tall styles of topiary design include Alberta spruce, arborvitae, and Juniper. For wider sculpted pieces, globe arborvitae, boxwood, or privet are accommodating. For the classic topiary "ball on a stick" design, you'll need a tree with a straight leader that will grow up a stake.
The Technique: Spiral
This Alberta spruce had grown too large for the corner where it had been planted as a sapling. I needed to either remove it, or prune it to be less overpowering in the small space. Armed with my bypass shears and a roll of orange surveyor's tape, I decided to try my hand at designing a spiral topiary. The tree is about 6 feet tall, and the project too
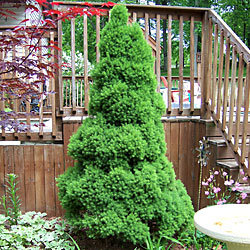
k me a little over two hours.
Look at your tree from all angles and decide just how sloping you want the spiral design to be. Take into consideration the height of the tree, and how wide the bottom is. The taller the tree, the closer together the spirals can be.
Start at the top and tie the ribbon to the tip, then lightly wind the ribbon around and down until you reach the bottom layer of branches. Tie the ribbon firmly.
Now step back and gauge how even the distances are between each strip; adjust all around until you have it just the way you want it to look when finished.
Starting halfway up the tree and cutting above the ribbon, prune away the first third of each branch. Work your way along the ribbon toward the top, stopping frequently to assess your work. Stop when you get to within about 12 inches from the top. Do not panic! The project will look terrible before it looks better--trust me.
Return to where you began and repeat the process, cutting below the ribbon. Again, remove the first third of each branch.
Step back and check to see that the spiral outline you've created will match the remainder of the ribbon on the bottom half of the tree. Adjust the ribbon if necessary.
Repeat the procedure for the lower half of the tree.
Now, this is the slow part. Start at the top of the tree and carefully follow each pruned branch back to the trunk; cut each one off about 1/2-inch from the main leader. Check frequently to be sure you're not taking smaller branches that make up the "spiral" you've created.
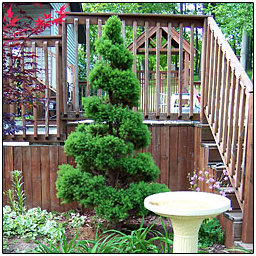
When your spiral is clearly defined, return to the tree top and blend the upper spiral into the tip.
Voila! DIY topiary! To learn about sculpting other simple shapes, do an Internet search for "how to topiary."

